📗 3주차에 배울 내용
- [추억앨범] 제이쿼리 적용
- [스타플릭스] 제이쿼리 적용
- 클라라이언트 - 서버 개념 이해하기
- Fetch 시작하기
- Fetch 연습하기
- [추억앨범] Fetch 적용
- [스타플릭스] Fetch 적용
- 숙제
1. [추억앨범] 제이쿼리 적용
PostBox 열고 닫기
추억 저장하기 버튼에 토글 기능 추가하기
토글(toggle)은 두가지 상태 사이를 전환하는 동작을 의미한다.
어떤 속성이나 상태를 켜거나 끄는 동작을 말한다.
function openclose() {
	$('#postingbox').toggle();
}
<div class="mytitle">
<h1>나만의 추억 앨범</h1>
<button onclick="openclose()">추억 저장하기</button>
</div>
<div class="mypostingbox" id="postingbox">
...
</div>
데이터 넣고 카드 생성하기
function makeCard() {
    let image = $('#image').val();
    let title = $('#title').val();
    let content = $('#content').val();
    let date = $('#date').val();

    let temp_html = `
    <div class="col">
        <div class="card h-100">
            <img src="${image}"
                class="card-img-top" alt="...">
            <div class="card-body">
                <h5 class="card-title">${title}</h5>
                <p class="card-text">${content}</p>
            </div>
            <div class="card-footer">
                <small class="text-muted">${date}</small>
            </div>
        </div>
    </div>`;
    $('#card').append(temp_html);
}
<div class="mypostingbox" id="postingbox">
<div class="form-floating mb-3">
<input type="email" class="form-control" id="image" placeholder="name@example.com">
<label for="floatingInput">앨범 이미지</label>
</div>
<div class="form-floating mb-3">
<input type="email" class="form-control" id="title" placeholder="name@example.com">
<label for="floatingInput">앨범 제목</label>
</div>
<div class="form-floating">
<input type="email" class="form-control" id="content" placeholder="name@example.com">
<label for="floatingTextarea">앨범 내용</label>
</div>
<div class="form-floating mb-3">
<input type="email" class="form-control" id="date" placeholder="name@example.com">
<label for="floatingInput">앨범 날짜</label>
</div>
<div class="mybtn">
<button onclick="makeCard()" type="button" class="btn btn-dark">기록하기</button>
<button type="button" class="btn btn-outline-dark">닫기</button>
</div>
</div>2. [스타플릭스] 제이쿼리 적용
PostBox 열고 닫기 (복습)
function openclose() {
    $('#postingbox').toggle();
}
<button onclick="openclose()" type="button" class="btn btn-outline-light">영화 기록하기</button>
...
<div class="mypostingbox" id="postingbox">
...
</div>
카드 생성하기 (복습)
function makeCard() {
    let image = $('#image').val();
    let title = $('#title').val();
    let comment = $('#comment').val();
    let star = $('#star').val();

    let temp_html = `
    <div class="col">
        <div class="card">
            <img src="${image}"
                class="card-img-top" alt="...">
            <div class="card-body">
                <h5 class="card-title">${title}</h5>
                <p class="card-text">${star}</p>
                <p class="card-text">${comment}</p>
            </div>
        </div>
    </div>`;
    $('#card').append(temp_html);
}
<div class="mypostingbox" id="postingbox">
<div class="form-floating mb-3">
<input type="email" class="form-control" id="image" placeholder="영화 이미지 주소">
<label for="floatingInput">영화 이미지 주소</label>
</div>
<div class="form-floating mb-3">
<input type="email" class="form-control" id="title" placeholder="영화 제목">
<label for="floatingInput">영화 제목</label>
</div>
<div class="input-group mb-3">
<label class="input-group-text" for="inputGroupSelect01">별점</label>
<select class="form-select" id="star">
<option selected>별점선택</option>
<option value="⭐">⭐</option>
<option value="⭐⭐">⭐⭐</option>
<option value="⭐⭐⭐">⭐⭐⭐</option>
<option value="⭐⭐⭐⭐">⭐⭐⭐⭐</option>
<option value="⭐⭐⭐⭐⭐">⭐⭐⭐⭐⭐</option>
</select>
</div>
<div class="form-floating mb-3">
<input type="email" class="form-control" id="comment" placeholder="추천 이유">
<label for="floatingInput">추천 이유</label>
</div>
<button onclick="makeCard()" type="button" class="btn btn-danger">기록하기</button>
</div>3. 클라이언트 - 서버 개념 이해하기
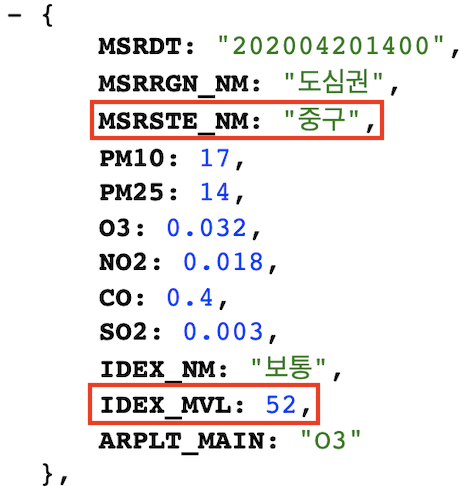
[서버->클라이언트]: JSON 이해하기
- 서울시 OpenAPI http://openapi.seoul.go.kr:8088/6d4d776b466c656533356a4b4b5872/json/RealtimeCityAir/1/99

[클라이언트->서버]: GET 요청 이해하기
- GET: 데이터 조회(Read)를 요청할 때 ex) 영화 목록 조회
- POST: 데이터 생성(Create), 변경(Update), 삭제(Delete) 요청할때 ex) 회원 가입, 회원 탈퇴, 비밀번호 수정
- GET 방식으로 데이터를 전달하는 방법
- google.com/search?q=아이폰&sourceid=chrome&ie=UTF-8
- q=아이폰(검색어), sourceid=chrome(브라우저 정보), ie=UTF-8 (인코딩 정보)
4. Fetch 시작하기
fetch 기본 골격
fetch("여기에 URL을 입력").then(res => res.json()).then(data => {
		console.log(data)
})
fetch("여기에 URL을 입력")
// 이 URL로 웹 통신을 요청한다. 괄호 안에 다른 것이 없다면 GET!
.then(res => res.json())
// 통신 요청을 받은 데이터는 res라는 이름으로 JSON화 한다
.then(data => {
console.log(data) // 개발자 도구에 찍어보기
}) // JSON 형태로 바뀐 데이터를 data라는 이름으로 붙여 사용한다
GET 요청은, url뒤에 아래와 같이 붙여서 데이터를 가져갑니다. http://naver.com?param=value¶m2=value2
POST 요청은, data : {} 에 넣어서 데이터를 가져갑니다. data: { param: 'value', param2: 'value2' },
완성코드
<!doctype html>
<html lang="ko">

<head>
    <meta charset="UTF-8">
    <title>Fetch 시작하기</title>
    <script src="https://ajax.googleapis.com/ajax/libs/jquery/3.5.1/jquery.min.js"></script>
    <script>
        function hey() {
            let url = 'http://spartacodingclub.shop/sparta_api/seoulair';
            fetch(url).then(res => res.json()).then(data => {
                console.log(data['RealtimeCityAir']['row'][0])
            })
        }
    </script>
</head>

<body>
    <button onclick="hey()">fetch 연습!</button>
</body>

</html>
5. Fetch 연습하기
미세먼지 OpenAPI 데이터 다루기
1. 미세먼지 데이터 찾기

2. 반복문으로 구 데이터를 출력해보기
fetch("http://spartacodingclub.shop/sparta_api/seoulair")
.then(res => res.json())
.then(data => {
    let rows = data['RealtimeCityAir']['row']
    rows.forEach((a) => {
        console.log(a)
    })
})
3. 구 데이터에서 구 이름, 미세먼지 수치를 골라내어 출력하기

fetch("http://spartacodingclub.shop/sparta_api/seoulair").then(res => res.json()).then(data => {
    let rows = data['RealtimeCityAir']['row']
    rows.forEach((a) => {
        console.log(a['MSRSTE_NM'], a['IDEX_MVL'])
    })
})
전체코드
더보기
<!doctype html>
<html lang="ko">

<head>
    <meta charset="UTF-8">
    <title>미세먼지 API로Fetch 연습하고 가기!</title>

    <script src="https://ajax.googleapis.com/ajax/libs/jquery/3.5.1/jquery.min.js"></script>

    <style type="text/css">
        div.question-box {
            margin: 10px 0 20px 0;
        }

        .bad {
            color: red;
        }
    </style>

    <script>
        function q1() {
            let url = 'http://spartacodingclub.shop/sparta_api/seoulair';
            $('#names-q1').empty();

            fetch(url).then(res => res.json()).then(data => {
                let rows = data['RealtimeCityAir']['row'];
                rows.forEach(a => {
                    let gu_name = a['MSRSTE_NM'];
                    let gu_mise = a['IDEX_MVL'];

                    let temp_html = ``;
                    if (gu_mise > 40) {
                        temp_html = `<li class="bad">${gu_name} : ${gu_mise}</li>`;
                    } else {
                        temp_html = `<li>${gu_name} : ${gu_mise}</li>`;
                    }
                    $('#names-q1').append(temp_html);
                });
            })
        }

    </script>

</head>

<body>
    <h1>Fetch 연습하자!</h1>

    <hr />

    <div class="question-box">
        <h2>1. 서울시 OpenAPI(실시간 미세먼지 상태)를 이용하기</h2>
        <p>모든 구의 미세먼지를 표기해주세요</p>
        <p>업데이트 버튼을 누를 때마다 지웠다 새로 씌여져야 합니다.</p>
        <button onclick="q1()">업데이트</button>
        <ul id="names-q1">
        </ul>
    </div>
</body>

</html>
6. [추억앨범] Fetch 적용
$(document).ready(function () {
    let url = "http://spartacodingclub.shop/sparta_api/seoulair";
    fetch(url).then(res => res.json()).then(data => {
        let mise = data['RealtimeCityAir']['row'][0]['IDEX_NM']
        $('#msg').text(mise)
    })
})
<p>현재 서울의 미세먼지 : <span id="msg">나쁨</span></p>7. [스타플릭스] Fetch 적용
$(document).ready(function () {
    let url = "http://spartacodingclub.shop/sparta_api/weather/seoul";
    fetch(url).then(res => res.json()).then(data => {
        let temp = data['temp'];
        $('#msg').text(temp);
    })
})
<li><a href="#" class="nav-link px-2 text-white">현재기온: <span id="msg"></span>도</a></li>
다음강의로 넘어가려고 했는데
이번 주차는 숙제가 있었다 !
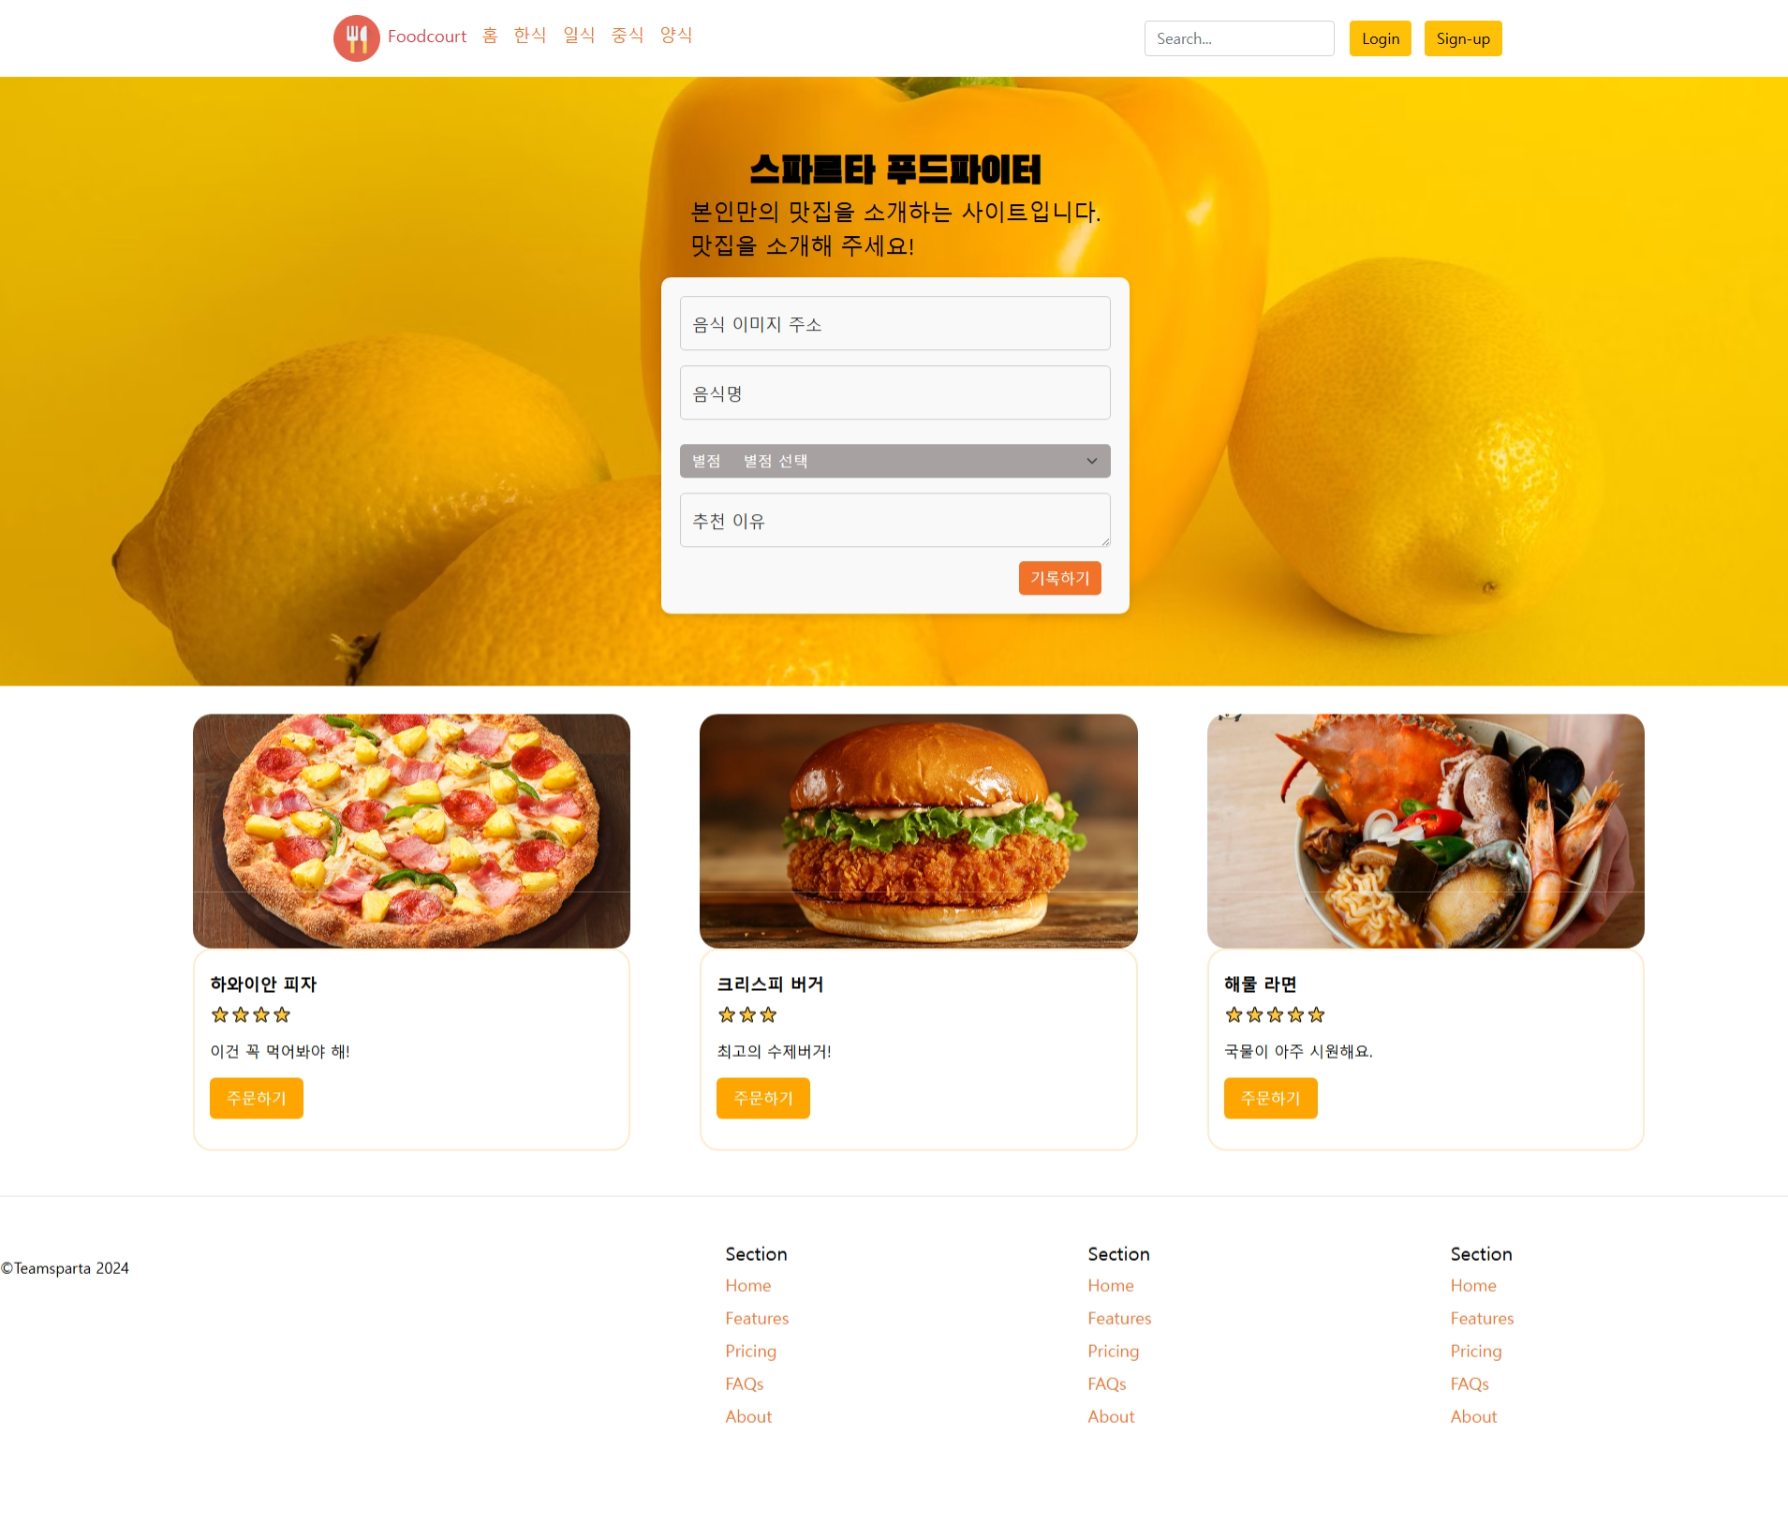
[문제] HTML, CSS를 활용하여 화면 만들기
준비물: 첨부파일
1. Bootstrap을 활용해서, jumbotron 완성하기
<!-- 점보 트론 적용 jumbotron -->
    <!-- - https://getbootstrap.com/
    - Bootstrap 사이트에서 jumbotron가져와 vscode에 붙여 넣어주세요.
    - 배경 이미지 적용을 위해 <div class="header"> 로 감싸주세요.
    - jumbotron의 내용을 예시사진과 똑같게 내용을 변경해 주세요.
        - 필요 없는 버튼, div를 적절하게 삭제
    - jumbotron <h1> 태그안에 `Blank Han Sans` 폰트 스타일을 적용해 주세요. -->

<div class="header">
    <div class="p-5 mb-4 bg-body-tertiary rounded-3">
        <div class="container-fluid py-5">
            <h1 class="display-5 fw-bold">스파르타 푸드파이터</h1>
            <p class="col-md-8 fs-4">본인만의 맛집을 소개하는 사이트입니다.<br>맛집을 소개해 주세요!</p>
        </div>
    </div>
</div>
2. Bootstrap을 활용해서, cards를 추가해보세요.
<div class="mycards">
        <!-- - https://getbootstrap.com/
        - Bootstrap 사이트에서 cards 가져와 vscode에 붙여 넣기
        - *Docs → Card → Grid cards에서 3번째 코드입니다.*
        - <button> 태그를 생성해 주세요.
        - <button> 태그안에 `card-button` 클래스를 부여해 주세요.
        - 카드에 내용은 자유롭게 채워 주세요. -->

        <div class="row row-cols-1 row-cols-md-3 g-4">
            <div class="col">
                <div class="card">
                    <img src="https://akamai.pizzahut.co.kr/2020pizzahut-prod/public/img/menu/RPPZ1893_RPEG0016_RPDO0003_l.png"
                        class="card-img-top" alt="...">
                    <div class="card-body">
                        <h5 class="card-title">하와이안 피자</h5>
                        <p class="card-text">⭐⭐⭐⭐</p>
                        <p class="card-text">이건 꼭 먹어봐야 해!</p>
                        <p class="card-button">주문하기</p>
                    </div>
                </div>
            </div>
            <div class="col">
                <div class="card">
                    <img src="https://www.francoislambert.one/cdn/shop/articles/mac_poulet_corn_flakes.webp?v=1723557298"
                        class="card-img-top" alt="...">
                    <div class="card-body">
                        <h5 class="card-title">크리스피 버거</h5>
                        <p class="card-text">⭐⭐⭐</p>
                        <p class="card-text">최고의 수제버거!</p>
                        <p class="card-button">주문하기</p>
                    </div>
                </div>
            </div>
            <div class="col">
                <div class="card">
                    <img src="https://recipe1.ezmember.co.kr/cache/recipe/2019/03/11/3d00e9089bf5242a805eaf791640a3b21.jpg"
                        class="card-img-top" alt="...">
                    <div class="card-body">
                        <h5 class="card-title">해물 라면</h5>
                        <p class="card-text">⭐⭐⭐⭐⭐</p>
                        <p class="card-text">국물이 아주 시원해요.</p>
                        <p class="card-button">주문하기</p>
                    </div>
                </div>
            </div>
        </div>
    </div>
3. 구글 폰트를 내 HTML에 적용해보세요.
/* 구글 폰트 import url 넣어주세요. */
/* 구글 폰트 CSS rules를 전체 적용해 주세요. */
@import url('https://fonts.googleapis.com/css2?family=Black+Han+Sans&family=Gowun+Dodum&display=swap');

.gowun-dodum-regular {
    font-family: "Gowun Dodum", sans-serif;
    font-weight: 400;
    font-style: normal;
}

.black-han-sans-regular {
    font-family: "Black Han Sans", sans-serif;
    font-weight: 400;
    font-style: normal;
}
문제를 다 푼 후, .header 레이아웃이 조금 거슬려서 CSS 를 살짝 만져줬다.
완성 !

https://github.com/gajicoding/web_basic
GitHub - gajicoding/web_basic
Contribute to gajicoding/web_basic development by creating an account on GitHub.
github.com
'Web > 강의' 카테고리의 다른 글
| [📗 왕초보 웹개발 종합반] 5주차: Firebase project 2, Github (0) | 2025.03.20 |
|---|---|
| [📗 왕초보 웹개발 종합반] 4주차: firebase project 1 (1) | 2025.03.19 |
| [📗 왕초보 웹개발 종합반] 2주차: Bootstrap, Javascript (0) | 2025.03.18 |
| [📗 왕초보 웹개발 종합반] 1주차: HTML, CSS, Bootstrap (0) | 2025.03.18 |